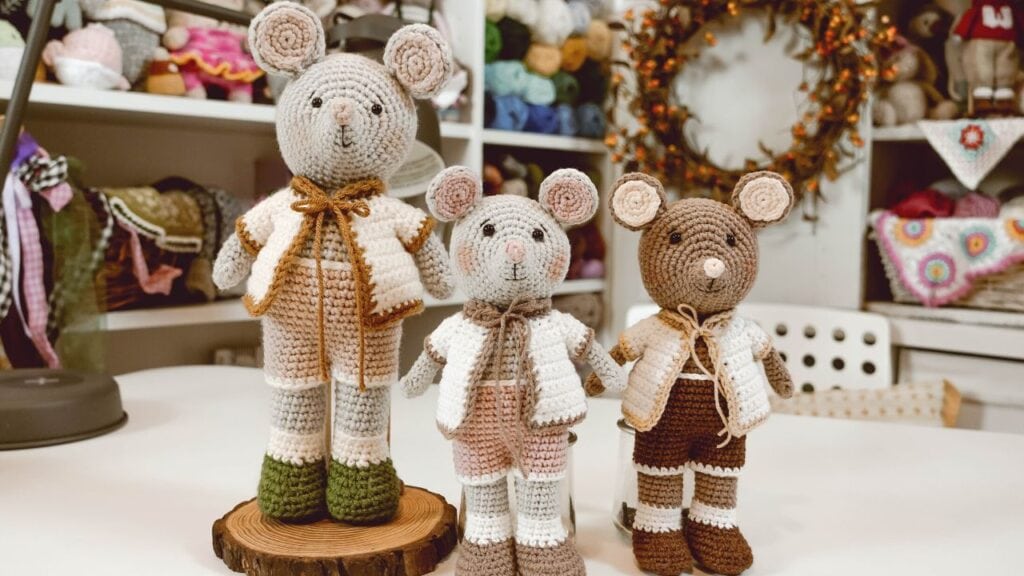
FREE AMIGURUMI CROCHET MOUSE PATTERN: Learn How to Make Amigurumi!
Looking for a fun and cute crochet project? Learn how to make your very own amigurumi mouse with this free amigurumi mouse pattern! Perfect for beginners and experienced crocheters alike.
Learn how to crochet toys with this FREE crochet amigurumi mouse pattern. You’ll find the full written instructions as well as a detailed video tutorial!
In the world of handmade crafts, there’s something undeniably enchanting about creating your own adorable amigurumi creatures. These charming crocheted plushies have gained immense popularity for their cuteness and versatility.
If you’re looking for your next crochet project, why not embark on a journey to bring a cuddly amigurumi mouse to life? In this blog post, I’ll guide you through the delightful process of crafting your very own amigurumi crochet mouse.
This post contains affiliates links and at no cost to you I may earn a teeny tiny commission if you choose to purchase them. Please know that I only recommend products I use and love! Thank you for supporting Elise Rose Crochet! You can read my full (and slightly boring) full disclosure here.

Introduction To Amigurumi And Crochet
Whether you’re an experienced crocheter or a complete beginner, you’ll discover that with a bit of yarn, a hook, and a pinch of creativity, you can create a soft and huggable companion that’s sure to steal your heart.
So, grab your crochet hooks, choose your favorite yarn colors, and let’s embark on this whimsical adventure together as we learn how to crochet an amigurumi mouse step by step.
PURCHASE the AD-FREE Pattern
If you would like to purchase the ad-free pattern you can find it on Etsy here:
You can also purchase the pattern on Ravelry here:
FULL VIDEO TUTORIAL
For those who enjoy learning from video tutorials you will find the full video here:
Amigurumi Crochet Mouse Pattern Inspiration
My inspiration for designing an amigurumi crochet mouse pattern comes from a deep-seated fascination with the art of crochet and a strong connection to the whimsical world of miniature creatures.
From an early age, I’ve been captivated by the idea of crafting something endearing and handmade. The amigurumi style’s ability to turn a skein of yarn into a charming stuffed companion has intrigued me for several years.
I find inspiration in the idea of creating a world of imaginative characters that can provide comfort, joy, and a touch of nostalgia.
Each amigurumi toy I design becomes a unique embodiment of my creativity and a vessel to convey the warmth and love that goes into handmade gifts. It’s this sense of connection and the smiles these tiny critters bring that continually drive my passion for crafting and designing amigurumi patterns.
Tips And Tricks For Perfecting Your Crochet Skills
This pattern is standard to most amigurumi toys. We will be crocheting in continuous rounds. The Petunia Petalmouse Amigurumi pattern is meant for advanced beginners/intermediate crocheters.
Remember that toy making is a process. It doesn’t have to be perfect and every toy you make will be an opportunity to improve your skills. I’ve learned something from every toy I’ve made.
Please share your finished toys with me on Facebook or Instagram @EliseRoseCrochet ! I would love to see and share your work!
Materials Needed For The Project
YarnArt Jeans (Fine/Sport weight yarn) in the colors:
- gray for the body (color number 49)
- off white for the cardigan, border for shorts & socks (color number 01)
- brown for shoes and border for cardigan (color number 71)
- rose pink for shorts, inner ears & nose (color number 83)
You can also make Petunia Petalmouse in a #4 weight (worsted) weight yarn. If you choose that option, you will need to use a 3.5 mm & 4 mm crochet hook.
KEY
- ch = chain
- sts(s) = stitch(es)
- slst = slip stitch
- sc = single crochet
- hdc = half double crochet
- inc = increase = 2 sc in one space
- dec = decrease = sc2tog
- BLO = back loop only
- FLO = front loop only
- sk = skip stitches
- sc3tog = single crochet 3 together
- 3 dc bobble = [yarn over, insert hook in stitch, yarn over and draw up a loop, yarn over, draw through 2 loops on hook] three times in same stitch, with four loops on hook yarn over and draw through all 4 loops
Step By Step Instructions For Making The Amigurumi Mouse
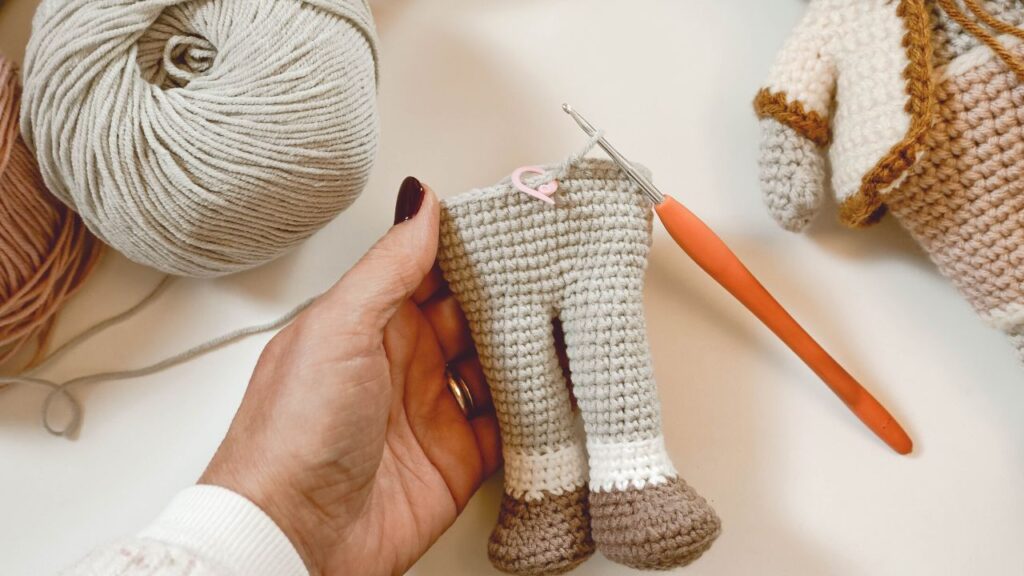
Leg 1
We will start with the shoes beginning with crocheting on the opposite side of the chain. Starting with color of yarn for the shoes…
•Chain 5
•Round 1: In 2nd ch from hook, 3 sc, make 3sc in last st, on the other side of the ch, 2 sc, inc [10]


•Round 2: inc, 2 sc, inc, 1 sc, inc, 2 sc, 2 inc [15]
•Round 3: inc, 4 sc, inc, 2 sc, inc, 4 sc, 2 inc [20]
•Round 4: 2 inc, 5 sc, inc, 2 sc, inc, 6 sc, inc, 2 sc [25]
•Round 5: sc in each st BLO [25]

•Round 6: 11 sc, inc, 2 sc, inc, 10 sc [27]
•Round 7: 11 sc, 4 dec, 8 sc [23]
•Round 8: 10 sc, 3 dec, 7 sc [20]
•Round 9: 9 sc, 2 dec, 7 sc [18]
Change to sock color

•Round 10: 8 sc, sc3tog, 7 sc [16]
•Rounds 11 – 13 (3 rounds): sc in each st [16]
Change to gray color for mouse

•Round 14: sc in each st BLO [16]
•Rounds 15 – 25 (11 rounds): sc in each st [16]
Leg 2
SECOND LEG
Note: Make the second leg the same as first, but after round 25, sc 1 more st (or to the inside of the leg).
•Round 26: Attach to the inside of the 1st leg with 1 sc. Sc 15 more around 1st leg, join to 2nd leg with 1 sc. Finish the round with 15 sc around 2nd leg [32]


Body
Legs are joined, we are now onto the body – Stuff the legs firmly and stuff the body as you work.

•Round 27: (7 sc, inc) 4 times [36]
•Round 28: (5 sc, inc) 6 times [42]
•Rounds 29 – 35 (7 rounds): sc in each st [42]
•Round 36: (5 sc, dec) 6 times [36]
•Round 37: sc in each st [36]
•Round 38: (4 sc, dec) 6 times [30]
•Round 39: sc in each st [30]
•Round 40: (3 sc, dec) 6 times [24]
•Round 41: sc in each st [24]
•Round 42: (2 sc, dec) 6 times [18]
•Round 43: sc in each st [18]
Make sure the body is well stuffed before closing.
Fasten off and leave a long tail for sewing the head to the body.
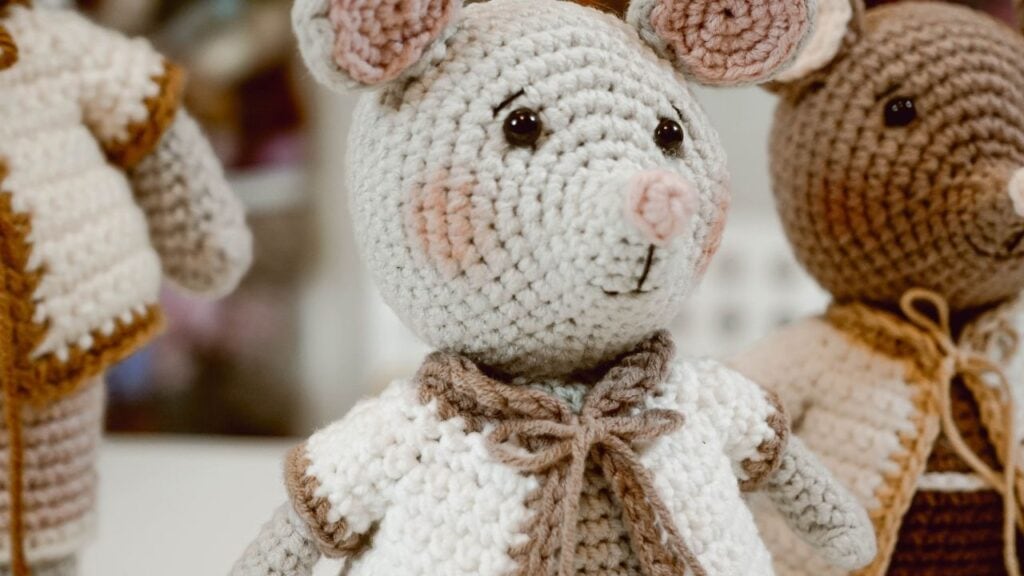
Amigurumi Crochet Mouse Head
HEAD – 2.5 mm hook & gray color
•Make 6sc in magic ring
•Round 1: sc in each st [6]
•Round 2: (1 sc, inc) 3 times [9]
•Round 3: (2 sc, inc) 3 times [12]
•Round 4: (3 sc, inc) 3 times [15]
•Round 5: 5 sc, 5 inc, 5 sc [20]
•Round 6: 5 sc (1 sc, inc) 5 times, 5 sc [25]
•Round 7: 5 sc (2 sc, inc) 5 times, 5 sc [30]
•Round 8: (4 sc, inc) 6 times [36]
•Round 9: (5 sc, inc) 6 times [42]
•Round 10: (6 sc, inc) 6 times [48]
•Rounds 11 – 17 (7 rounds): sc in each st [48]
Attach safety eyes between Rounds 8 & 9, 9 – 10 sts apart
•Round 18: (6 sc, dec) 6 times [42]
•Round 19: (12 sc, dec) 3 times [39]
•Round 20: (11 sc, dec) 3 times [36]
•Round 21: (4 sc, dec) 6 times [30]
•Round 22: (3 sc, dec) 6 times [24]
•Round 23: (2 sc, dec) 6 times [18]
•Round 24: (1 sc, dec) 6 times [12]
•Round 25: dec around [6]
Make sure the head is well stuffed before closing.
Fasten off, take needle through the FLO of each 6 st and pull tight to close, weave in ends.

Nose for Amigurumi Crochet Mouse
SNOUT CAP – 3 mm crochet hook & pink color
•Make 6 sc in magic ring
•Slst to the first st in the round
Fasten off, leaving a long tail for seaming.
Place the snout over the first round of the head. It will fit like a little cap over the nose. Sew into place. Weave in ends.

Amigurumi Crochet Mouse Ears
OUTER EARS – (make 4) 2.5 mm crochet hook & gray color
•Make 6 sc in magic ring
•Round 1: inc in each st [12]
•Round 2: (1 sc, inc) 6 times [18]
•Round 3: (2 sc, inc) 6 times [24]
Fasten off leaving a long tail for seaming.
INNER EARS – (make 2) 2.5 mm crochet hook & pink color
•Make 6 sc in magic ring
•Round 1: inc in each st [12]
•Round 2: (1 sc, inc) 6 times [18]
Fasten off leaving a long tail for seaming.
EAR ASSEMBLY
Sew the pink inner ear to the outside of one gray outer ear. Next sew a gray outer ear to the back of the gray and pink inner ear.

Fasten off leaving a long tail for seaming.
Attach onto the head at Rounds 14 & 15.
Attach head to body.

Amigurumi Mouse Arms
ARMS – (make 2) 2.5 mm hook & gray color
•Make 5 sc in magic ring
•Round 1: inc in each st [10]
•Round 2: sc in each st [10]
•Round 3: sc, 3 dc bobble st, 8 sc [10]
Lightly stuff hand and lower arm, do not stuff upper arm at all
•Rounds 4 – 17 (14 rounds): sc in each st [10]
Fasten off, leaving a long tail for seaming.
Attach at round 42 at sides of body.

Cardigan for Amigurumi Crochet Mouse
CARDIGAN – 3 mm crochet hook & off-white color
NOTE: If you find that the cardigan is too tight, go up to a 3.5 mm crochet hook.
•Ch 25
•Row 1: in 2nd ch from hook, sc 24, ch1, turn [24]
•Row 2: (3 sc, inc) 6 times, ch 1, turn [30]
•Row 3: (4 sc, inc) 6 times, ch 1, turn [36]
•Row 4: 6 sc, ch 6, sk 6, 12 sc, ch 6, sk 6, 6 sc, ch 1, turn [36]
•Row 5: 6 sc, 6 sc in ch from previous row, 12 sc, 6 sc in ch from previous row, 6 sc, ch 1, turn [36]
•Row 6: sc in each st, ch 1, turn [36]
•Row 7: 8 sc, inc (under armhole), 18 sc, inc, 8 sc, ch 1, turn [38]
•Row 8: sc in each st, ch 1, turn [38]
•Row 9: 9 sc, inc, 18 sc, inc, 9 sc, ch 1, turn [40]
•Row 10: sc in each st, ch 1, turn [40]
•Row 11: 10 sc, inc, 18 sc, inc, 10 sc, ch 1, turn [42]
•Row 12: sc in each st [42]
•Row 13: 11 sc, inc, 18 sc, inc, 11 sc, ch 1, turn [44]
Fasten off and weave in ends.
SLEEVES – 3 mm crochet & off-white color
Attach yarn in any st around the arm hole. Work in continuous spirals.
•Rounds 1 -3 (3 rounds): 15 sc [15]
Fasten off and weave in ends.
Cardigan Border
CARDIGAN BORDER – 3 mm crochet hook & light brown yarn
•Join with a sc in bottom right corner of cardigan.

•Sc in each st around the bottom edge.

•Make 3 sc in the corner.
•Make 12 sc up the side of cardigan opening.
•Make 3 sc in the corner.
•Sc in each of the chain stitches across the top of cardigan.
•Make 3 sc in the corner.
•Make 12 sc down the side of the cardigan opening.
•Make 2 sc in the corner where border began.
Fasten off and weave in ends.
Cardigan Collar
COLLAR – 3 mm crochet hook & light brown yarn
NOTE: We will be working over 26 stitches for the collar; 24 from the border, plus 2 additional sts for each corner.
•Leave a long tail for tying both ends at the front of the cardigan.
•Starting at the top inside of cardigan, join yarn with a slst to the top middle corner st (from previous corner border round).
•Hdc, 3 dc, hdc, 14 slst, hdc, 3 dc, hdc, slst
Tie the ends into a bow at the front of cardigan.

Crochet Mouse Shorts
SHORTS – 3 mm crochet hook & rose pink yarn
•Ch 36 and join together to form a ring.
•Rounds 1 – 3 (3 rounds): sc in each st [36]
•Round 4: (forming hole for tail) ch 2, sk 2, 34 sc [36]
•Rounds 5 – 12 (8 rounds): sc in each st [36]

Leg Hole 1
LEG 1:
Begin to divide the legs for shorts – legs are divided directly beneath hole for tail. Mark the first and last sts for leg 1 and first and last stitches for leg 2.
•Round 13: Sc in each st, joining to the first st in the round with a slst. [18]
Fasten off and weave in ends.

Leg Hole 2
Leaving a long tail for seaming any holes between the legs, join yarn in the space for 2nd leg hole at the back of the shorts with a sc.
•Round 13: Sc in each st joining to the first st in the round with a slst. Sc in each st [18]

SHORTS BORDER – 3 mm hook and off white yarn
•Slst around each st in top of shorts [36]
•Sc around both leg holes of shorts [18]
Amigurumi Crochet Mouse Pattern Details
DETAILS:
With black embroidery floss, embroider a mouth and two eyebrows.

TAIL:
Ch 25
Starting in 2nd ch from the hook, sc in each ch across [24]
Leave a long tail to sew onto back of mouse.
Use the tail hole for the shorts as a guide for where to attach the tail to the mouse bottom.
Ideas For Customizing Your Mouse With Different Colors And Designs
Use different colors to create a brown, gray or white mouse.
You can also use so many different colors to match the:
- seasons
- your favorite colors
- or to match your own crocheted wearable!
Copyright
©2023 Elise Rose Crochet, Elise Speed. All rights reserved. This pattern is for personal use only. This pattern or any parts may not be reproduced, distributed, resold, translated, published or posted in any way either online or print.
You have permission to sell hand finished Petunia & Peter Petalmouse toys on a limited basis. Please add “Designed by Elise Rose Crochet” on listing information as well as any tag attached to the toy.
Amigurumi Crochet Mouse Pattern: Pin for Later!