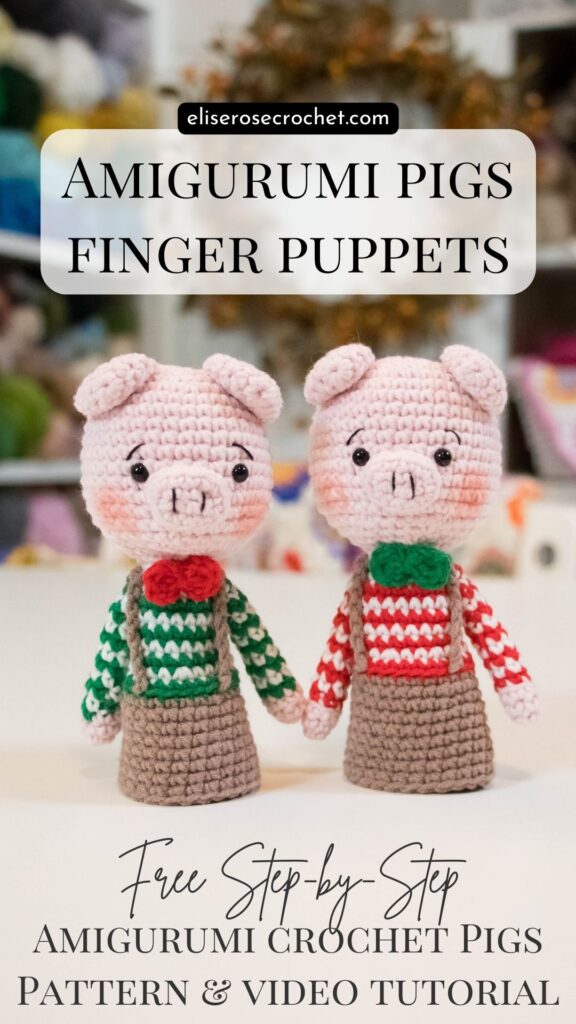
The Amigurumi Pig Finger Puppet Pattern – FREE Crochet Pattern
The Amigurumi Pig Finger Puppet – FREE Crochet Pattern is the perfect project for crocheters who love small projects that are full of whimsy.
Crocheting is an art form that transcends mere yarn and needle. It’s a creative journey that lets you bring adorable characters to life, and what could be more charming than crafting amigurumi pig finger puppets?
These tiny, whimsical creations not only make for delightful decorations but also bring joy as playful companions for storytelling or imaginative play.
Amigurumi Pig Finger Puppets – FREE Crochet Pattern
Amigurumi has captured the hearts of crafters worldwide. Its charm lies in the simplicity of stitches combined with endless possibilities for creativity.
When it comes to making finger puppets, this simple amigurumi technique opens doors to creating beloved characters like pigs in an engaging and miniature form.

Thanks to Marly Bird for including the Christmas Pigs in the 24 Days of Quickies!

Save for Later! Sharing is Caring

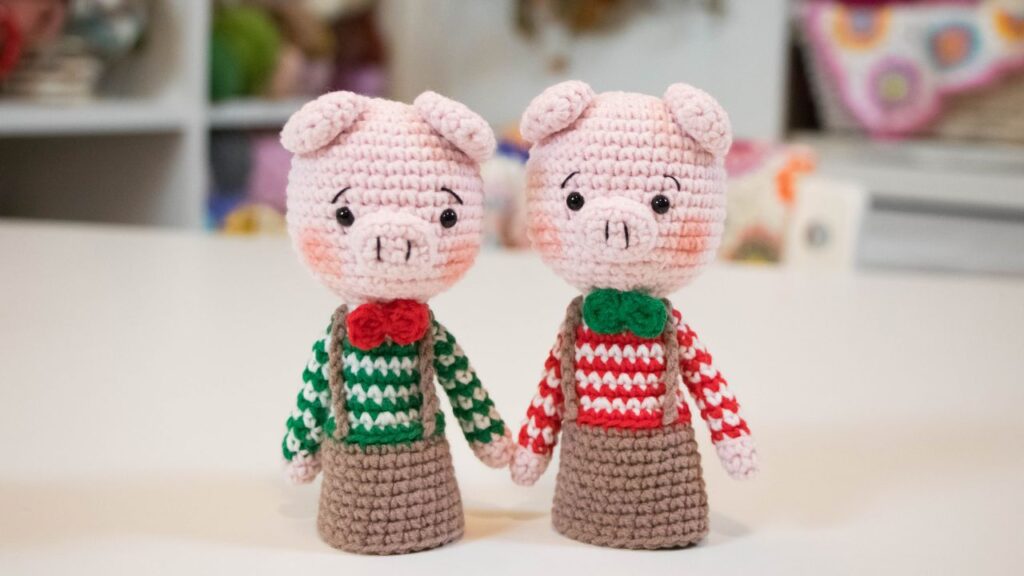
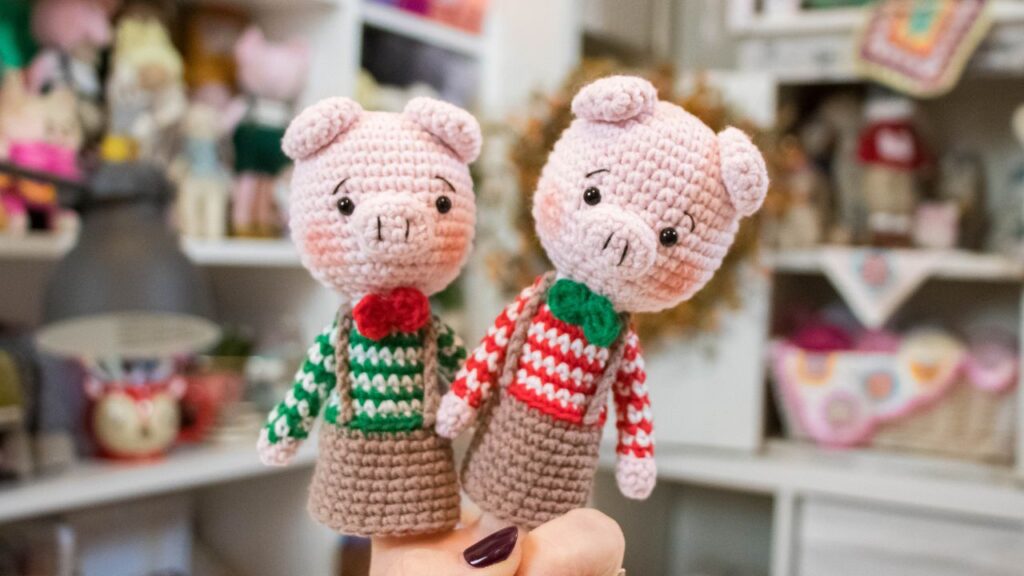
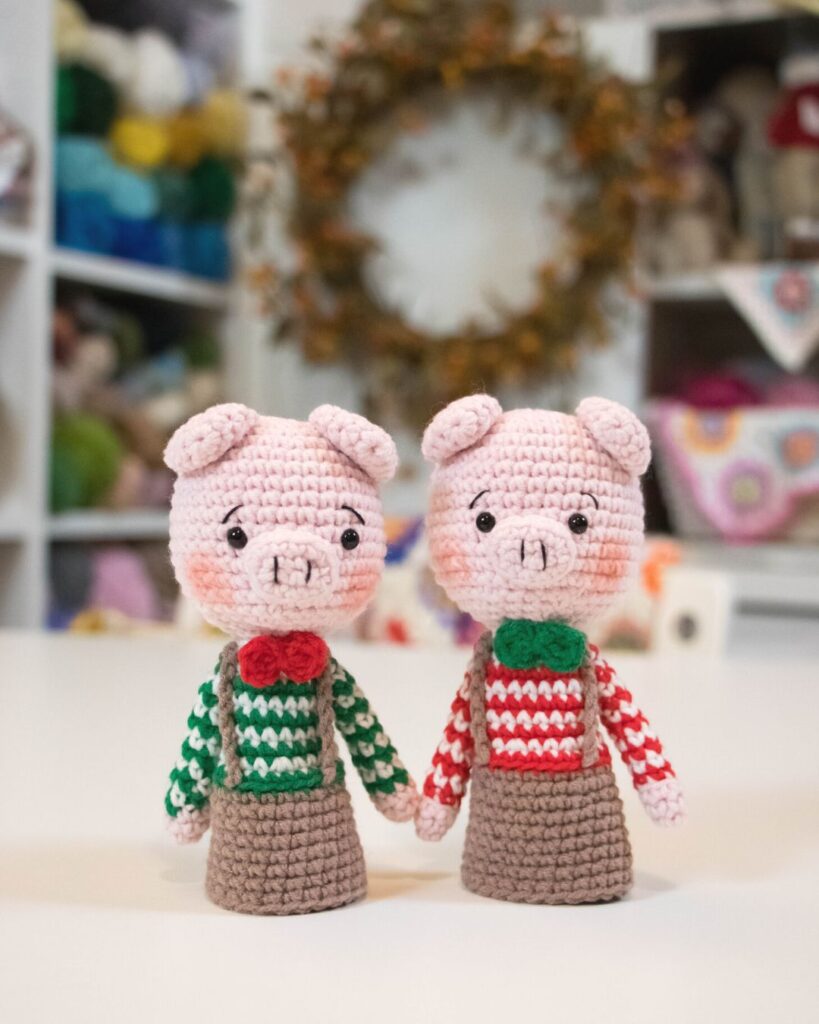
In a cozy barn nestled amidst frosted meadows, Percy and Pippin, two plump pigs, twirl in excitement as Christmas approaches. Donning striped sweaters, they craft ornaments from hay and dance merrily to the tune of jingling sleigh bells, spreading joy in their oink-filled wonderland.
Techniques
This pattern is standard to most amigurumi toys. We will be crocheting in continuous rounds. The Three Not So Little Pigs pattern is meant for advanced beginners/intermediate crocheters.
Remember that toy making is a process. It doesn’t have to be perfect and every toy you make will be an opportunity to improve your skills. I’ve learned something from every toy I’ve made.
This post contains affiliates links and at no cost to you I may earn a teeny tiny commission if you choose to purchase them. Please know that I only recommend products I use and love! Thank you for supporting Elise Rose Crochet! You can read my full (and slightly boring) full disclosure here.
PURCHASE the AD-FREE Pattern
If you would like to purchase the ad-free pattern you can find it on Etsy here:
You can also purchase the pattern on Ravelry here:
Materials
YarnArt Jeans (Fine/Sport weight yarn) in the colors:
•Red for the shirt (Pig 1 only)
•Green for the shirt (Pig 2 only)
•Light brown for the suspenders


Video Tutorial for Amigurumi Pig Finger Puppets – FREE Crochet Pattern
Keep scrolling to find the complete written instructions, photos and video tutorial.
Notes
•The Amigurumi Pig Finger Puppets – FREE Crochet Pattern is crocheted using continuous rounds.
•Mark the beginning of each round with a stitch marker.
•Keep an accurate count of your rounds and number of stitches per round.
•The number in front of the stitch abbreviation stands for how many stitches worked. For example: “6 sc” would mean “work one sc in each of the next 6 stitches”.
•The number in brackets at the end of a round indicates how many stitches you should have after working that round.
•The best way to stuff is to do a little at a time as you are making the pig.
Key – Pattern Written in US Crochet Terms
- ch = chain
- sts(s) = stitch(es)
- sl st = slip stitch
- sc = single crochet
- hdc = half double crochet
- inc = increase = 2 sc in one space
- dec = decrease = sc2tog
- BLO = back loop only
- FLO = front loop only
Amigurumi Pig Finger Puppets Pattern
In a cozy barn nestled amidst frosted meadows, Percy and Pippin, two plump pigs, twirl in excitement as Christmas approaches. Donning striped sweaters, they craft ornaments from hay and dance merrily to the tune of jingling sleigh bells, spreading joy in their oink-filled wonderland.
We will start with the top of the Christmas Pig head…
Head – With Pink Color

- Make 6sc in magic ring
- Round 1: 1 inc in each st [12]
- Round 2: (1 sc, 1 inc) 6 times [18]
- Round 3: (2 sc, 1 inc) 6 times [24]
- Round 4: (3 sc, 1 inc) 6 times [30]
- Round 5: (4 sc, 1 inc) 6 times [36]
- Rounds 6 – 15: 1 sc in each st [36]


Place 4.5 mm or 5 mm safety eyes between rounds 11 & 12, six stitches apart
- Round 16: (4 sc, 1 dec) 6 times [30]
- Round 17: (3 sc, 1 dec) 6 times [24]
- Round 18: (2 sc, 1 dec) 6 times [18]
- Round 19: (1 sc, 1 dec) 6 times [12]
- Round 20: 1 sc in each st BLO [12] {photo 1}
- Round 21: dec around [6]

Make sure the head is well stuffed before closing.

Fasten off, take needle through the FLO of each 6 st and pull tight to close, weave in ends.

Amigurumi Pig Body

Join with white color with a sc at back of the head at Round 20 in the BLO {photo 2}. Alternate white and red (or green) for stripes.

- Rounds 1 – 2: 1 sc in each st [12] {photo 3}
- Round 3: (1 sc, 1 inc) 6 times [18]
- Rounds 4 – 8: 1 sc in each st [18]
- Round 9: (2 sc, 1 inc) 6 times [24]
- Round 10: 1 sc in each st [24]

Change to light brown color
- Round 11: 1 sc in each st BLO [24]
- Rounds 12 – 20: 1 sc in each st [24]
Make as many rounds as you need for finger length.
Fasten off and weave in ends.

Ears – Make 2 With Pink Color
- Make 6 sc in magic ring
- Round 1: (1 sc, inc) 3 times [9]
- Round 2: (2 sc, inc) 3 times [12]
- Rounds 3 – 4: 1 sc in each st [12]
Sl st to the first st in the round, fasten off, leave a long tail for sewing ears to the head. Add the ears to the top of the head 6 stitches apart, or wherever you think they look cute for your little pig. Angle the ears down facing toward the face.

Snout – With Pink Color

- Ch 4
- Round 1: Starting in 2nd ch from hook, 2 sc, make 3 sc in last st, on other side of the ch, 1 sc, 1 inc [8]
- Round 2: 1 inc, 2 sc, 2 inc, 2 sc, 1 inc [12]
- Round 3: 1 sc in each st BLO [12]

Sl st to the first st in the round, fasten off, leave a long tail for sewing to the face. Attach between Rounds 11 – 14, top part of snout level with the eye. placement.

Arms – Make 2 Starting With Pink Color
- Make 6 sc in magic ring
- Rounds 1 – 2: 1 sc in each st (6)
- Change to red/green color. Alternate red/green and white for each round.
- Rounds 3 – 13: 1 sc in each st (6)
Fasten off leaving a long tail for seaming at Rounds 1 & 2 at side of body.
Suspenders – Make 2 With Light Brown Yarn

- With pig head facing away from you, attach yarn with a slst to the front loop from Round 11 directly beneath the shoulder seam in front of the pig.
- Ch 18 (make more or less chains depending on your individual tension).
- Cross ch across the back and attach yarn with a slst on front loop from Round 11 in the back, directly beneath the shoulder seam in back of pig.

Bowtie – With Red or Green Color
- Step 1: ch 3
- Step 2: 2 dc in 2nd ch from hook
- Step 3: ch 2, slst to original ch
- Step 4: ch 2
- Step 5: 2 dc in original ch
- Step 6: ch 2
- Step 7: slst to original ch
Fasten off and weave in ends. Wrap yarn around middle of bow, leave a long tail for sewing bowtie at top of shirt.

Bowtie Chart

The Three NOT So Little Pigs PDF Pattern
Details
Using 2 strands of black embroidery floss, embroider two vertical lines on snout and two eyebrows above eyes.
Copyright
©2023 Elise Rose Crochet, Elise Speed. All rights reserved. This pattern is for personal use only. This pattern or any parts may not be reproduced, distributed, resold, translated, published or posted in any way either online or print.
You have permission to sell hand finished Christmas Pigs Finger Puppets toys on a limited basis. Please add “Designed by Elise Rose Crochet” on listing information as well as any tag attached to the toy.
Tips for Personalization
Feel free to experiment with different yarn colors to give your Christmas pigs amigurumi finger puppets patter unique personalities. Add miniature scarves, tiny jingle bells, or even a little gift bag to make each finger puppet stand out.

Spread Joy with Your Creation
Once your Christmas pig finger puppets are complete, they are ready to enchant both kids and adults alike. Imagine the joy on someone’s face as they wiggle these little pigs on their fingers, bringing a touch of festive whimsy to any gathering.
Crocheting these adorable finger puppets isn’t just about creating toys; it’s about crafting moments of joy and connection during the most magical time of the year.
So, gather your yarn and crochet hooks, let your creativity flow, and bring these charming Christmas pigs to life to spread holiday cheer one stitch at a time!
Happy crafting, and Merry Christmas!
Creating finger puppets with a holiday twist like Christmas pigs is a delightful way to usher in the festive spirit and bring joy to those around you. If you’re a fan of crocheting, this pattern might just become your new favorite.
Pin for Later!