Ultimate Knitting Toys Resource
In the Ultimate Knitting Toys Resource post I will share my favorite resource for all things toy knitting. I have never found something quite so comprehensive and I think you are going to find it a gold mine of information as well as inspiration.
The Ultimate Knitting Toys Resource is disguised as an ordinary, albeit adorable, pattern book. Based on the cover, you would expect to only find knitted patterns of animals like a mouse, a fox, and a dog. While you will definitely discover those, there is so much more to Knitted Animal Friends by Louise Crowther.

Knitting Toys Resource
When I originally bought Knitted Animal Friends I was expecting to find lots of gorgeous patterns of animals and their clothing. The book had been recommended to me by a follower on Instagram who has impeccable taste for handmade toys. I immediately fell in love with the lovely cover and the sweet knitted animals.

What I wasn’t expecting, was to find such an incredible knitting toys resource. There are forty different patterns in this book, but the Abbreviations and Techniques sections are absolute gold mines of information for toy knitters both novice and experienced.
This post contains affiliates links and at no cost to you I may earn a teeny tiny commission if you choose to purchase them. Please know that I only recommend products I use and love! Thank you for supporting Le Petit Saint Crochet!

Knitting Toys Learning Curve
There is a definite learning curve when beginning to knit toys. If you are already an experienced crocheted amigurumi maker, you will find many similar techniques. But you may be surprised that it’s actually a bit more complicated to knit toys than to crochet them. There are distinct techniques that you will not find necessary when crocheting amigurumi.
For example, many knitted toys require a great deal more seaming than crocheted ones. Seaming can be a bit more complicated as well, if you’ve ever learned how to do the mattress seam, you know exactly what I mean. Also to knit in the round you will typically need to learn how to use double point needles. That was the biggest learning curve for this old dog.
I am often asked to share tutorials for tricky toy knitting skills and up until now, I didn’t have a resource guide for them. I am a big fan of having hard copies for crocheting and knitting. For one thing, most printed books have been looked over by an editor and have had any misinformation corrected. We all know that isn’t the case on the internet. Unless you are certain the source is legitimate, you could be taking a chance on learning how to do things the proper way.
I am so very pleased to be able to finally recommend a comprehensive knitting toys reference guide to you all.
Knitted Animal Friends

There’s absolutely nothing wrong with buying this book just for the patterns, which I will discuss down below. But if you only see this book as a collection of cute patterns, you are missing this rich source of toy knitting information.

Abbreviations for Knitting Toys
This is going to sound a bit odd, but I learned a lot from the Abbreviations section of this book. There are forty-three in total, and yes I counted them all. I learned how to do stitches that I had never even heard of before like the PCDD and the SSSP. Each abbreviation is followed by a well written set of directions for the stitch. I love that all this information is organized together in one convenient spot.

Knitting Toys Techniques
This is where all the good stuff is hiding. At fourteen pages long, there is so much information about how to knit toys. This section is worth the entire price of the book, in my humble opinion. Even if you never planned on knitting these patterns, the techniques area provides detailed information about seaming, stuffing, and pinning, just to name a few.
There are dozens of photos in the techniques section from how to make an i-cord to mattress seaming. The author covers vertical and horizontal seaming as well as the half mattress stitch, which I had never even heard of before. The half mattress stitch is used to attach some of the animals’ body parts to the head and body. Who knew? Not this guy!
The Patterns

If you are interested in knitting the toys from this book, you will not be disappointed. There are thirteen different adorable animals to knit.
Animals
- George the Dog
- Bella the Cat
- Noah the Horse
- Dorothy the Mouse
- Charlotte the Fox
- Archie the Squirrel
- Holly the Hedgehog
- Maisie the Pig
- Stanley the Raccoon
- Tilly the Hare
- Amelia the Duck
- Harry the Ram
- Louis the Owl

Wardrobe
Each animal has its very own wardrobe, but the best part is that all the clothes fit all the animals. You aren’t limited in any way, shape or form. The bodies are all the same size, so any piece of the wardrobe will fit each of the animals perfectly.

There are even four different styles of knitted shoes. And the French Knickers are just about the cutest things I have ever seen in my life!
Louis the Owl
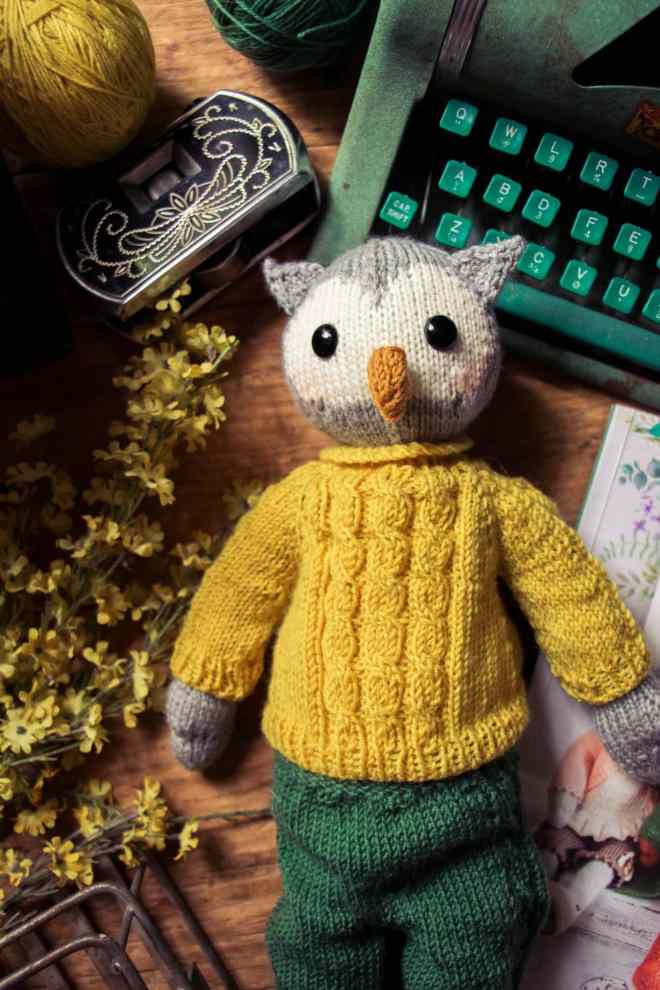
I chose to make Louis the Owl because I fell in love with his inquisitive face. At eighteen inches tall, he is the largest toy I have ever crocheted or knitted by far. His gorgeous cable knit joggers and sweater fit him perfectly.
Yarn
The book does a very good job explaining which yarns to use for these patterns. Because her personal recommendations are for a cotton brand, I chose two Cascade yarns that worked perfectly.

Read more about why I no longer use cotton and how to deal with pain from crocheting and knitting.
For the animal head and body I used Cascade Superwash 220 Sport and for the clothing I used Cascade Heritage. These worked very well together but there are a lot of options to choose from. You will need to choose a yarn that has a similar tension and that information will be on the ball band or yarn label.

Cons
I do have two cons, but please don’t let it be a reason not to purchase this book as a resource. These are minor issues, but I wanted you to be aware of them. Each pattern book I have ever used has had cons and thankfully this one only has two.
- You are going to need several different sized needles to be able to complete your toy. The animals are knitted flat, but the clothing is knitted in the round. You will need several sets of standard and double point needles. My favorite needles are Addi Knitting Needles and ChiaoGoo. I have several of both and have found the quality to be superior to other brands I have tried.
- The other con is that I wish the author had included how many stitches should be at the end of each round. It is included, but not as often as I would like. It helps me to know that I’m doing a complicated pattern correctly if I end up with the correct number of stitches.

Knitting Toys Resource
I hope you enjoyed this pattern book review and the Knitting Toys Resource recommendation. It is my intention to always share my honest opinion about the products and projects I use and do.
Whether you would like to knit one of these adorable toys for yourself or would just like to have the book as a resource, I believe you will be happy with it. I enjoy collecting print references that I can return to again and again.
Finally, I would love to hear from you, whether or not you have made one of the animals from this book. Have you knitted toys before?
Knitting Toys Resource Guide


I’VE NOT SEEN THIS BOOK NOR, OBVIOUSLY, DONE ANYTHING FROM IT. BUT FROM YOUR REVIEW, IT SOUNDS LIKE IT MAY BE A GOOD SOURCE FOR KNITTING ANIMALS. i CAN ALWAYS USE ALL THE EDUCATION i CAN GET. AS I HOPE YOU WILL REMEMBER, I HAVE ONLY DONE TWO OF THE LITTLE COTTON RABBITS, OF WHICH WERE A CHALLENGE, BUT WERE VERY FUN TO SEE THE FINISHED PRODUCT, SO I AM DEFINITELY INTERESTED IN LEARNING MORE.
I really believe this will be a great resource for you! So much good information, as well as so many adorable patterns! ðŸ°ðŸ°ðŸ°
Your Owl is so adorable!!! There are so many cute patterns in that book! Never enough time…….
Too many cute patterns, not enough time!!! I totally understand that!! 😂😂😂
WOW! what a cool book with a ton of resources!
I’ve made the Hedgehog from this book, and she’s adorable! I have the yarn for the owl next!
Such a wonderful book!!
Oh my goodness! These are so cute, thanks for sharing this resource.
So glad you like it!!
ADORABLE!
Thank you so very much!!
Thank you very much for the review, I have ordered this book along with the doll book earlier today. I have knit several animals (about 60 Little Cotton Rabbits animals) and several Amanda Berry animals. I am eagerly awaiting the arrival of Louise’s books so I can begin!
Since you are such an experienced toy knitter I think you will really appreciate these patterns! Hope you love it as much as I do.
hi! i recently bought this book and i’m attempting to make one of the animals but i’m running into some trouble with the counting. i don’t know if it’s a mistake on my end or the book. i’m trying maisie the pig, and for the head, it requires that i cast on 11 stitches, and for the first RS row, it says to [k1, m1] to last stitch, then k1. if i started with 11 stitches, at the end i should only have 16 stitches, but it says that i should have 21 stitches. can someone help me?
Hello. The pattern is correct, for every knit stitch for the previous round you will “make 1” except after the last stitch. So you will be adding 10 new stitches to the round. So if you start with 11, add 10 you will have 21. Hope that makes sense! ðŸ·ðŸ·ðŸ·
Hi thanks for your comprehensive review. I am currently knitting the dog and things have gone smoothly up until the very end – I realised nowhere in the book does it tell you how to attach the head to the body! It’s a small thing but kind of important, and I don’t want to get it wrong – have you come across it anywhere?
Oh no!! I haven’t done the dog. Did you check the back of the book where it goes into some of the finishing techniques? ðŸ¶ðŸ¶ðŸ
I used the technique from the Little Tearoom teddy pattern: Anchor head in place using long doll/darning needles or small-sized dpns. Make sure the face is positioned where you want it. Using the yarn end at the neck, attach head to body, taking needle alternately behind an edge stitch of neck and then the head fabric. Work around and around in a small but ever-increasing circle several times until the head feels secure when removing the anchor pins. Once complete, secure yarn end and then take the needle into stuffing and out a few times. Pull gently and cut.
Thanks so much for sharing!!
I am interested in this answer too. There are no instructions for attaching the hare head.
I just attached the head like I would for any knitted toy pattern. Have you looked at any tutorials on YouTube? â¤ï¸